 Prep time
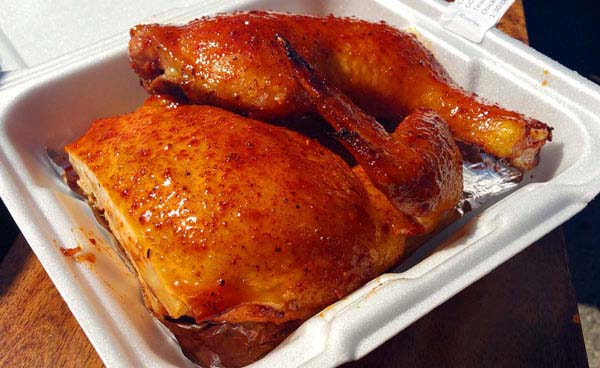
3 hours 30 mins Cook time 2 hours 30 mins Total time 6 hours My standard response is two easy tips which will give you 90% of the results of competition teams. They are: 1) wet brine the chicken before applying my Jailbird Chicken rub, and 2) cook your chicken in a covered half foil pan after the bark/crust sets. I wrote this handy recipe so I could point future callers to it each time I get the same question. Step 1: A cooking brine is mixture of water and salt plus flavors (sugar, herbs, spices, color, etc.). The advantage of a wet brine is that it’s penetrates very evenly into your protein and makes your chicken more moist and flavorful. This is caused by the repulsion of the positive and negative charged sodium and chloride ions and the flow of a salty solution into the protein through a process of diffusion and osmosis. Of course, I’m over-simplifying the process so please don’t debate me on the science as all I’m suggesting is that a salty soak will make your chicken more forgiving to overcooking and give it better flavor. Be aware that the texture gets a bit mushy if you soak it for too long. Three hours is perfect based on the salinity specification in my recipe (about 7.5%). Less than 3 hours, the flavor is lacking. More than 3 hours, the texture is compromised. I know because I’ve tweaked this formula over many years to win in double-blind judging. When you bite into perfectly cooked chicken, it should have a springiness to the meat and it should be juicy, moist, and flavorful even after spending 2+ hours in the smoker at 275F. Step 2: I like to cook my chicken (thighs, half-chickens, quarters, wings, or breasts) on the pit grate at 275F with some apple chunks for flavor until the bark or crust forms on the skin. I don’t worry about the time. It may be anywhere from 35 mins for wings, 45 minutes for breasts, 60 minutes for thighs, or 1:15 for half chickens. The key in Step 2 is to remove the chicken after the crust forms and wrap it in foil for the second phase. You can wrap using sheets of aluminum foil or put the crusted chicken into a half or full foil pan and then tightly cover it with foil. For competition, I squirt two lines of Parkay on the chicken pieces but for home cooking, I skip the Parkay. This second phase will tenderize the skin and make it bite-through. Remember that barbecue chicken cooked in a smoker under 325F will not have crispy skin like roasted chicken so the objective is to render the collagen in the skin to make it tender. This typically takes another 35 mins for wings, 45 minutes for breasts, 60 minutes for thighs, or 1:15 for half chickens. Be advised that the 35:35; 45:45, 60:60; 1:15:1:15 recommended times are merely a guide. Depending on the brand, size, and cut of chicken, and your smoker, you may have to vary your times. For example, my current Costco Fosters Farms thighs I’m cooking at contests on my WSM-18 on the top rack @275F needs 60:50. That is 60 minutes to crust and 50 minutes wrapped in foil. At the 50 minute mark, I take out one thigh and do a bite-tenderness test. I then decide if another 5 minutes is necessary or it’s perfect. You may need to experiment a bit to find your optimum timing for the chicken brand and chicken cut you buy. Notice so far that I have not said anything about the internal temp as my cooking method will yield chicken that has a very high finish temperature above 185F. You might be concerned that is will be overcooked and dry but it’s not. You will have to trust me. Here’s a challenge for you. If you use my rub and sauce, it may be one of the best championship chickens you’ve tried to cook. Try it and you will see. Author: Harry Soo Recipe type: Entree Cuisine: American Serves: 4 Ingredients
Instructions
0 Comments
Contrary to what your neighbor says, greasy grill grates and carbon buildup on the lid do not improve the flavor of your food. Rancid grease garnished with scale is not something I see on restaurant menus very often. When grease burns, it makes acrid smoke that can ruin a meal. And grease buildup has caused many an inferno. A clean grill is a good grill.
"It's hard to be funny when you have to be clean." -Mae West Before each cook you need to do a little light cleanup to keep your grill or smoker performing optimally, to prevent off flavors, and to prolong your cooker's life. Then, once a year your device needs a more thorough cleanup and maintenance. If you use it a lot, do a thorough cleaning two or three times a year and before you store it for winter. Before you start, check your grill's manual for any special instructions. If you can't find it, it may be available on the manufacturer's website for download. Remember: A clean grill is a good grill.
The black crust on the grates is mostly carbon. It tastes bad. In addition carbon insulates the grates and can stick to food. So it is vital that your food go on clean grates. Click here to read my article discussing how to clean grill grates.
Scale is a buildup of carbon, soot, creosote, combustion by-products, and schmutz, usually on the hood and sides. Scale can drop from the hood onto your meal. Scale also decreases the reflectivity of the inner surfaces and that can reduce heat. I don't worry about a thin coat of carbon, but when it starts to crack and curl, I scrape it off and vacuum it up. A plastic putty knife and a good vacuum cleaner with a hose attachment are handy for cleaning the interior of a grill. Before you go at it, beware that there can be some serious black liquid and large chips of carbon flakes as byproduct of your efforts, so roll your grill into your neighbor's yard when he is out of town before you start. If your neighbor never goes out, perhaps you want to do this in the street near a sewer drain, or over a drop cloth. Your town might have laws regulating disposal of grease, so check into them. It is helpful to have on hand a plastic putty knife, a bucket, rubber gloves, a stiff wire brush, a softer scrub brush, sponges, steel wool, paper towels, garden hose with nozzle (or pressure washer), dish soap, and cleaner fluid. A mild enzymatic cleanser like Dawn Grill Cleaner or Dawn Power Dissolver is probably safer than chemical cleaners whose residue could be noxious. Never use oven cleaner on the interior and cooking surfaces. If you have a built-in thermometer, clean the probe and if you use a hose be careful not to get water into the dial area. Then again, most built-in dial thermometers are crap, so why don't you just remove it and use the hole to insert the probe of a good digital thermometer.
If you use water to clean, remove electrical parts like igniters or cover them with plastic wrap and tape. Some new grills have glass or ceramic "infrared" burners. They need to be handled very carefully. Read the manual. Clean the louvers that allow exhaust to escape. They also provide draft through the cooking chamber and that pulls oxygen into the combustion system so you get an optimum flame. To clean the bottom, remove the heat diffusers over the burners and anything else that is easy to remove so you can scrape below and between the burners with the putty knife. If you can easily remove the burners, you should, and inspect the tubes and the gas jets to make sure there are no obstructions. If there are cracks, replace them. You can even shoot water through the tubes to check them out. Spiders like to make their homes in these tubes so check for them and other obstructions. They like to climb in through the venturi, the adjustable air intake shown in blue at the top of this page. When you are done, check the gas/air mix. Gas grills are typically tuned for the proper mix at the factory, but occasionally they need adjustment. Venturis usually have a set screw. Loosen the screw, fire up, and rotate the venturi until the flame is blue with minimal orange in the tip. Do it at night so you can see the color of your flame best. Finally, straighten a paper clip and poke them through the gas jet holes to make sure they aren't clogged. My article on gas grill setup has a section on troubleshooting that you should read. Charcoal grillsCheck the coal grate. It often warps and corrodes. It is subjected to some serious heat after all. Don't try to straighten it out if it is warped. It will probably crack. As long as it is not preventing airflow underneath you can keep using it. Replacements are easy to find. Also check other moving parts like vents and chimneys. Clean out the ash: Ash holds moisture and can chemically attack steel. Get a plastic half-gallon milk jug and cut it up like the one shown here. It makes a great scoop for removing cold ashes. Needless to say, do not remove hot ashes, and remember, ashes should always go into a metal can. Embers can glow far longer than you think. Pellet grills and smokers Water is the enemy of pellet grills and smokers, so keep your hose and pressure washer far far away. Pellet burners have a digital controller, a fan, a motorized auger, and a firepot with an igniter rod. If you get water in the electronics, you could ruin them. A wet igniter, fan, or motor can short circuit or rust, so keep them all dry. In addition, the pellets are made from sawdust, and they will turn into a slurry if they get wet. Because the pellets burn so efficiently, there is very little ash. A shop vac or handheld vac is usually all you need. The deflector plat that sits beneath the grates can build up a lot of carbon and grease. That can insulate the metal and reduce its heat output. Scrub it and if necessary, remove it and hit it with the power washer or steamer. It is also very important that the thermostat probe be clean. Look at the picture of the black probe here. It will not read accurately. Offset smokers: Grease can pool in the smoke chamber of an offset smoker. To prevent messy cleanup, line the chamber with foil before cooking. Mold in your smoker: It's pretty shocking when the rip off the cover off your cooker in spring to discover the interior is covered in white fuzz. Weber Smokey Mountain owners are especially vulnerable to this jolt. Click here to learn what to do when you are attacked by fungii. Grease pansGrill manufacturers have different strategies for dealing with drippings and grease. If yours has a grease pan or collector, remember to check it before each cook. It can overflow or catch on fire. If there is a grease chute, make sure it is cleaned, too. Flavor bars, lava rocks, ceramic briquets, grease pans, and other deflectorsGas and pellet grill manufacturers have devised a variety of methods to keep the burners clean, reduce hotspots, prevent flare-ups, and radiate heat. Flavor bars and metal radiators: Nowadays most use some sort of cap between the burners and the cooking grates. Weber calls them "flavor bars" and other producers have their own proprietary name. Sauce and grease can remain on them after a cook. You should always preheat the grill thoroughly to carbonize this gunk. If not, it will put out a lot of greasy soot that can deposit on the meat. The pork chop at right was inedible it was so bitter from soot, even with lots of sauce. After these drippings burn off they can cake the deflectors in carbon and that insulates them and reduces the amount of heat transmitted. So every now and then pull them out and brush them, scrape them, and wash them with soapy water. Enamel surfaces usually corrode with time and need to be replaced. If there is a stainless steel replacement, get it. It lasts longer. Lava rocks and ceramic briquets: Periodically you need to inspect these guys and spread them around so they are evenly distributed. They are very porous and absorb grease, but when the grease heats up it usually turns to carbon. Ceramics and lava rocks can often be flipped. Eventually they need to be replaced. The exterior: Some folks obsess over the shine on their battleship sized grill. Not me. That's one of the reasons I don't buy stainless if I can avoid it. But if you want to see your reflection in your grill, literally as well as figuratively, there are some tricks to cleaning the exterior. Never use steel wool or metal brushes, Use a scrubbie sponge, warm water, and dish soap. For stubborn stains, try vinegar or diluted ammonia. To remove water spots, try unsweetened club soda. On stainless, work on a cool grill, and follow the grain. They sell stainless steel cleaners in hardware stores that do a pretty good job of restoring the luster. Totally Sauced science advisor Prof. Greg Blonder about painting a rusted grill or smoker. He recommended Rust-Oleum Filler Primer, Northline High Temperature Paint, or Cerakote Ceramic Coatings. "Wire brush, sand, wipe clean with mineral spirits, let it dry, and then lay down a light layer of paint, let it dry thoroughly, and then another light layer. Let dry thoroughly, overnight would be good. Make sure to run the grill for an hour or two before using it with food so any volatile organics escape." I don't recommend painting the interior where food goes or where heat might vaporize the paint. |
AuthorMeathead Mc Fadden ArchivesCategories |
 RSS Feed
